Reimage FTD or Secure Firewall Threat Defense for 1000, 2100 and 3100 Series
Introduction
This document describes an example of a reimage procedure for the Secure Firewall Threat Defense (formerly Firepower Threat Defense).
Prerequisites
Requirements
Cisco recommends knowledge of these topics:
- There are no specific requirements for this guide
Components Used
The information in this document is based on these software and hardware versions:
- Cisco Secure Firewall Threat Defense 2110 (FTD) Version 7.2.4
The information in this document was created from the devices in a specific lab environment. All of the devices used in this document started with a cleared (default) configuration. If your network is live, ensure that you understand the potential impact of any command.
Background Information
Specific requirements for this document include:
- A console cable connected on the FTD
- A TFTP Server with the installation package (
.SPA) already uploaded
This reimage procedure is supported on appliances:
- Cisco Secure Firewall Threat Defense 1000 Series
- Cisco Secure Firewall Threat Defense 2100 Series
- Cisco Secure Firewall Threat Defense 3100 Series
Before You Begin
- A reimage procedure erases all previous configurations. To restore any configurations, generate a backup before you start this procedure.
- This procedure only applies for Firewalls running FTD software.
- Verify the model is compatible with this procedure.
Configure
Step 1. Format the appliance:
I. Connect to the console port of your appliance and create a console connection.
II. Log into the FXOS chassis CLI.
III. Type connect local-mgmt to move to the management console.
III. Use the command format everything to delete all configurations and boot images on the appliance.
III. Type yes to confirm the procedure

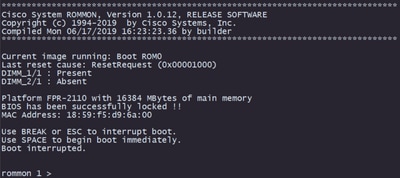
Step 2. Interrupt the boot process by pressing ESC key to enter ROMMON mode:
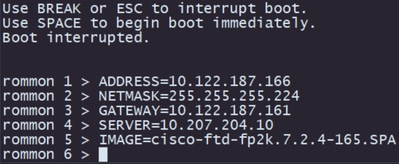
Step 3. Fill the network and remote storage parameters with your configurations to prepare for the TFTP download: (FTD Rommon )
I. The parameters needed to be filled are:
A. ADDRESS=ip_address
B. NETMASK=netmask
C. GATEWAY=gateway_ip
D. SERVER=remote_storage_server
E. IMAGE=path_to_the_file
Caution: ROMMON Mode only supports TFTP protocol, FTP, SCP and SFTP and USB are not supported on the initial boot up process.
Step 4. Type set to confirm the provided configurations:
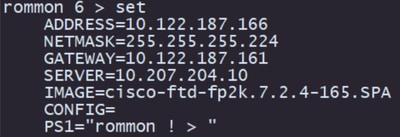
Note: Validate that the provided information is correct and if you notice an error, adjust the parameter and type set again.
Step 5. Type sync to apply the network and remote storage configurations:
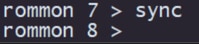
Step 6. Initiate the boot process with the command tftp -b:
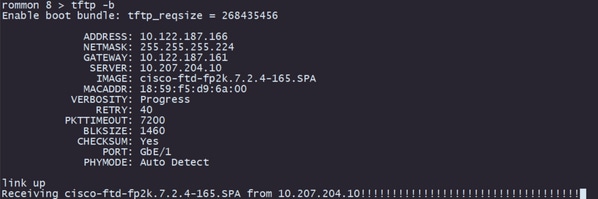
Note: If the download for the boot image is successful you are going to see several exclamation marks (!) confirming the download, otherwise review that your configurations are appropriate or validate if your device can reach the remote storage server.
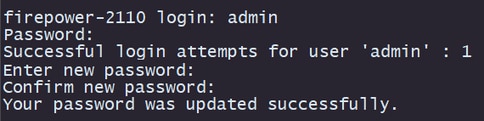
Step 7. Once the system comes up log into the device using default credentials (admin/Admin123) and change the appliance password:
Note: This error can get displayed while the initial setup is occurring however, it is going to be cleared after you install the threat defense software as described in later steps.

Step 8. Configure the IP of the management interface:
I. Move to the fabric scope with the command scope fabric-interconnect a
II. Set the management IP configuration with the command set out-of-band static ip ip netmask netmask gw gateway

Step 9. Download the Threat Defense installation package:
I. Move to firmware scope with the command scope firmware
II. Download the installation package:
A. If you are using a USB you can use the command download image usbA:package_name
B. If you are using a supported remote storage server you can use the command download image tftp/ftp/scp/sftp://path_to_your_package

Note: When using remote storage servers, it is required to use absolute paths on the syntax of the command as displayed on the example.
Step 10. Validate the download progress with the command show download-task:

Note: Once the download state transitions to Downloaded you can proceed to the next step.
Step 11. Review that the package is already on the firmware list with command show package:

Note: Copy the package version as it is going to be used on the installation of the Threat Defense software.
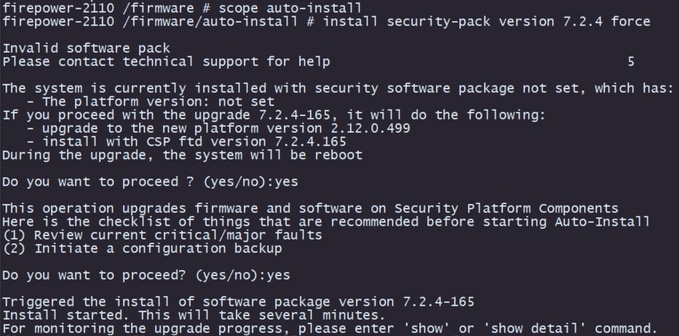
Step 12. Install the Threat Defense software to finalize the reimage:
I. Move to the install scope with command scope auto-install.
II. Proceed with the install of the threat defense software with command install security-pack version version force
III. Two confirmation prompts are going to appear on the console, please confirm both of them by typing yes.
Caution: The reimage process takes up to 45 minutes, be aware that the firewall is going to reboot while installing.
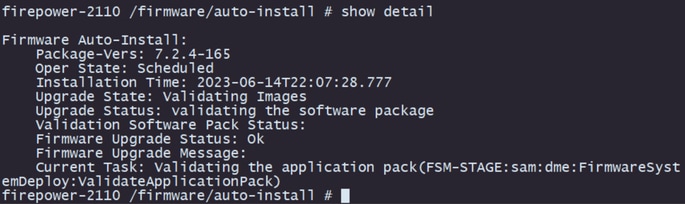
Validation
Validate the upgrade process with the command show detail: