لایسنس اسمارت برای روترهای مجازی CSR1000
اگر چه خواندن داکیومنت ها و مراحل طولانی در Cisco.com همیشه سرگرم کننده است، با این وجود ما فکر کردیم که می توانیم کانفیگ لایسنس اسمارت CSRv سیسکو را در یک پست سریع جمع آوری کنیم.

پیش نیاز ها:
- نمونه لایسنس سیسکو CSRv در حال اجرا با نسخه IOS-XE 3.15S یا بالاتر.
- یک Smart Accountبا CSR1000v license
- CSR1000v برای دستیابی به Cisco Smart Software Manager دارای اتصال به اینترنت باشد یا در عوض، به نمونه local Cisco Smart Software Manager Satellite دسترسی داشته باشد.
ابتدا، CSR1000v را براساس نیاز و لایسنس خریداری شده، technology package مناسب و throughput level تنظیم کنید.
به عنوان نمونه، برای لایسنسAPPX 10 Mbps:
Router(config)# platform hardware throughput level MB 10
Router(config)# license boot level appx
(توجه داشته باشید که مجدداً روتر لازم است تا لایسنس جدید فعال شود.)
سپس، اطمینان حاصل کنید که name resolution پیکربندی شده است:
Router(config)# ip name-server <DNS_server_ip_1> <DNS_server_ip_2>
قبل از فعال کردن Smart Licensing، Call Home configuration لازم است:
Router(config)# call-home
<Router(config-call-home)# contact-email-addr <your_email@domain.com
“Router(cfg-call-home-profile)# profile “CiscoTAC-1
Router(cfg-call-home-profile)# active
Router(cfg-call-home-profile)# destination transport-method http
Router(config)# service call-home
زمان فعال کردن Smart Licensing:
outer(config)# license smart enable
در این مرحله شما باید Cisco Smart Account token خود را از Cisco Smart Software Manager در https://software.cisco.com بگیرید.
و در آخر اینکه می توانید روتر CSR1000v را با استفاده از همین Token مشابه با Smart Account ثبت کنید:
<Router# license smart register idtoken <token_value
در این مرحله، روتر باید در بخش Inventory Account Smart شما ظاهر شود و لایسنس مناسب را consume کند. این می تواند به طور مستقیم بر روی روتر اعتبار سنجی شود:
Router#sh license all
Smart Licensing Status
======================
Smart Licensing is ENABLED
Registration:
Status: REGISTERED
[…snip…]
License Authorization:
Status: AUTHORIZED on Jan 17 11:36:58 2018 EST
[…snip…]
License Usage
==============
CSR 1KV APPX 10M (appx_10M):
Description: CSR 1KV APPX 10M
Count: 1
Version: 1.0
Status: AUTHORIZED
راهنمای Smart Licensing برای روتر های Access و Edge
لایسنس های CSR1000v PAK را به لایسنس های اسمارت تبدیل کنید.
مرحله 1:
با استفاده از نام کاربری و رمز عبوری که از Cisco به دست آورده اید، وارد پورتال CSSM شوید.
مرحله 2:
روی Convert to Smart Licensing > ConvertLicenses > License Convertion Wizard کلیک کنید.
مرحله 3:
از لیست کشویی Product Family ،Family محصول را انتخاب کنید.
مرحله 4:
شناسه دستگاه را مشخص کنید و بر روی Search کلیک کنید.
مرحله 5:
دستگاهی را که اضافه شده است را انتخاب کنید و Convert Licenses to Smart Licensing را انتخاب کنید.

مرحله 6:
با انتخاب گزینه مربوطه از لیست کشویی Virtual Account، لایسنس ها را به یک Virtual Account اختصاص دهید.
مرحله 7:
تعداد لایسنس هایی را که می خواهید فیلد Quantity to Convert را تبدیل کنید مشخص کنید.

مرحله 8:
در صفحه Convert to Smart Entitlements، روی Submit کلیک کنید.

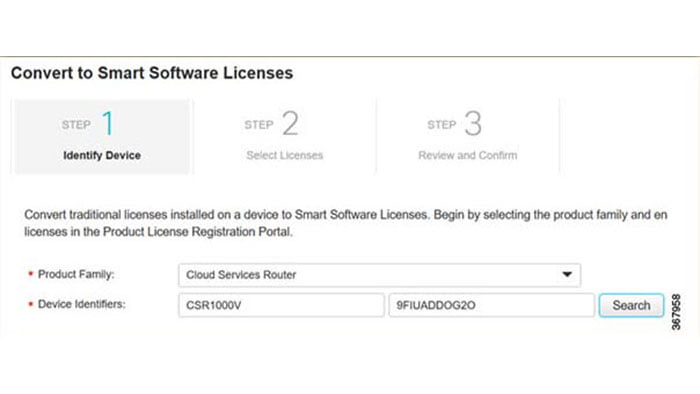
Convert PAK Licenses in License Registration Portal
مرحله 1:
با استفاده از credentials هایی که از سیسکو بدست آورده اید، وارد License Registration Portal شوید.
مرحله 2:
بر روی Devices tab کلیک کنید، سپس روی Add Devices کلیک کنید.
مرحله 3:
همانند تصویر زیر در Add Device pop-up screen، appropriate Product Family, and UDI را انتخاب کنید.

Cisco Software Licensing (CSL)
Installing CSL Evaluation Licenses for Cisco IOS XE 3.13S and Later
In Cisco IOS XE 3.13S and later, including IOS XE Denali 16.2 and later, the Cisco CSR 1000v/ISRv first boots with the AX feature set enabled and the maximum throughput limited to 100 Kbps. The following evaluation licenses are available:
-
AX feature set with 50 Mbps maximum throughput
-
APPX feature set with 5 Gbps maximum throughput
The evaluation licenses are available for download at the Cisco Software Licensing portal.
 Note Note |
If you are installing an evaluation license for a feature set with a maximum throughput of 10 Gbps, then additional configuration is required to support the 10 Gbps interface. For more information, see the Configuring an Interface for 10Gbps Maximum Throughput section in this guide. |
Perform the following steps after the router first boots:
SUMMARY STEPS
- enable
- show license udi
- Log on to the Cisco Software Licensing portal to obtain the evaluation license: http://www.cisco.com/go/license.
- license install stored-location-url
- configure terminal
- license boot level { ax | appx }
- end
- write memory
- reload
- show license detail
DETAILED STEPS
| Command or Action | Purpose | |
|---|---|---|
| Step 1 |
enable Example: |
Enables privileged EXEC mode.
|
| Step 2 |
show license udi Example: |
Displays all the UDI values that can be licensed in a system.
|
| Step 3 |
Log on to the Cisco Software Licensing portal to obtain the evaluation license: http://www.cisco.com/go/license. |
|
| Step 4 |
license install stored-location-url Example: |
Installs the evaluation license obtained in the previous steps.
|
| Step 5 |
configure terminal Example: |
Enters global configuration mode. |
| Step 6 |
license boot level { ax | appx } Example: |
Activates the evaluation license on the router upon the next reload. Select ax if installing the AX feature set evaluation license. Select appx if installing the APPX feature set evaluation license. Accept the end user license agreement when it is prompted. |
| Step 7 |
end Example: |
Exits global configuration mode. |
| Step 8 |
write memory Example: |
Saves the running configuration to NVRAM. |
| Step 9 |
reload Example: |
Restarts the router to enable the feature set and the maximum throughput supported by the evaluation license. The router reloads with the evaluation license activated. The evaluation license expires 60 days from the time it is activated. |
| Step 10 |
show license detail Example: |
Displays the license information. |
What to do next
| Note |
If you are installing an evaluation license for a feature set with a maximum throughput of 10 Gbps, then additional configuration is required to support the 10 Gbps interface. For more information, see the Configuring an Interface for 10Gbps Maximum Throughput section in this guide. |
Installing CSL Regular Licenses for Cisco IOS XE 3.13S and Later
In Cisco IOS XE 3.13S and later, including IOS XE Denali 16.3 and later, the Cisco CSR 1000v/ISRv first boots in limited mode with the AX feature set enabled and the maximum throughput limited to 100 Kbps. You can generate multiple licenses for the router from one PAK. The purchased PAK determines the number of licenses you can generate.
Repeat these steps for each license available for your PAK.
| Note |
If you installed a license that supports a maximum throughput of 10 Gbps, then additional configuration is required to support the 10 Gbps interface. For more information, see the Configuring an Interface for 10Gbps Maximum Throughput section in this guide. |
SUMMARY STEPS
- Obtain the PAK.
- enable
- show license udi
- Convert the PAK to a license by entering the PAK and the UDI into the Cisco Product License registration portal.
- license install stored-location-url
- configure terminal
- license boot level { ipbase | security | ax | appx }
- end
- write memory
- reload
- show license detail
- platform hardware throughput level MB {10 | 100 | 1000 | 10000 | 250 | 2500 | 50 | 500 | 5000 }
DETAILED STEPS
| Step 1 |
Obtain the PAK. The PAK is provided to you when you order or purchase the right to use a feature set.
|
| Step 2 |
enable Enables privileged EXEC mode.
|
| Step 3 |
show license udi Displays all the UDI values that can be licensed in a system.
|
| Step 4 |
Convert the PAK to a license by entering the PAK and the UDI into the Cisco Product License registration portal. Example:When entering the UDI, enter only the 11-character serial number; for example, . The UDI is case-sensitive, and should be entered in all capital letters. After entering the appropriate information, you will receive an e-mail containing the license information that you can use to install the license:
|
| Step 5 |
license install stored-location-url Example:Installs the license.
|
| Step 6 |
configure terminal Example:Enters global configuration mode. |
| Step 7 |
license boot level { ipbase | security | ax | appx } Example:Activates the license on the router upon the next reload. |
| Step 8 |
end Example:Exits configuration mode. |
| Step 9 |
write memory Example:Saves the running configuration to NVRAM. |
| Step 10 |
reload Example:Restarts the router to enable the feature set and the maximum throughput supported by the license. Note: If you are installing an AX license, you do not need to restart the router. |
| Step 11 |
show license detail Example:The following is an example of the show license detail command showing an installed active license: Displays the license information. |
| Step 12 |
platform hardware throughput level MB {10 | 100 | 1000 | 10000 | 250 | 2500 | 50 | 500 | 5000 } Example:(Optional) Changes the maximum throughput level. Note: After issuing this command, you do not need to restart the router. |
What to do next
Repeat these steps for each license available for your PAK.
Configuring an Interface for 10 Gbps Maximum Throughput
If you installed a license with maximum throughput with 10 Gbps, then additional configuration is required to obtain the 10 Gbps throughput on an interface. Perform the following additional steps.
SUMMARY STEPS
- enable
- configure terminal
- interface GigabitEthernet number
- no negotiation auto
- speed 10000
DETAILED STEPS
| Command or Action | Purpose | |
|---|---|---|
| Step 1 |
enable Example: |
Enables privileged EXEC mode.
|
| Step 2 |
configure terminal Example: |
Enters global configuration mode. |
| Step 3 |
interface GigabitEthernet number Example: |
Enters interface configuration mode. |
| Step 4 |
no negotiation auto Example: |
Disables the autonegotation protocol setting on the interface. |
| Step 5 |
speed 10000 Example: |
Configures the interface speed to 10 Gbps. |
Installing CSL Feature Add-on Licenses for Cisco IOS XE 3.13S and Later
Understanding the Cisco CSR 1000v Memory Allocation
You can use feature add-on licenses to add memory to the Cisco CSR 1000v/Cisco ISRv. Memory is allocated to both the IOSd component and the data plane component. The amount of the memory allocation is dependent on the licenses installed.
You can install multiple 4 GB add-on licenses. You can add 4 GB of additional memory by installing the broadband feature license and then install further 4 GB add-on licenses.
The following table lists how the memory is allocated depending on the amount of VM Memory and the feature licenses installed.
| Note |
Restrictions apply when installing memory add-on licenses with a broadband feature license. For more information, see the Information About Installing Broadband Feature License and the Installing Broadband Feature License sections in this guide. |
| Note |
The Cisco CSR 1000v is no longer available with a VM Memory of either 2.5 GB or 6 GB. |
|
VM Memory |
Default Memory Allocation |
One 4 GB add-on license or one broadband license |
(Two 4 GB add-on licenses) or (one broadband license + one 4 GB add-on license) |
(Three 4 GB add-on licenses) or (one broadband license + two 4 GB add-on licenses) |
|---|---|---|---|---|
|
4 GB (Additional memory allocation using an add-on license or broadband license is not available for this level of VM memory.) |
IOSd = 2.5 GBDataplane = 1.5 GB |
NA |
NA |
NA |
|
8 GB |
IOSd = 2.5 GBDataplane = 1.5 GB |
IOSd = 5.5G Dataplane = 2.5G |
NA |
NA |
|
12 GB |
IOSd = 2.5 GBDataplane = 1.5 GB |
IOSd = 5.5G Dataplane = 2.5G |
IOSd = 9.5G Dataplane = 2.5G |
NA |
|
16 GB |
IOSd = 2.5 GBDataplane = 1.5 GB |
IOSd = 5.5G Dataplane = 2.5G |
IOSd = 9.5G Dataplane = 2.5G |
IOSd = 13.5G Dataplane = 2.5G |
Further Information about Memory Add-on Licenses
This section seeks to explain some misleading memory usage values that may be shown after installing add-on licenses. Installing add-on memory provides additional memory that is assigned to the main IOS-XE process (IOSd). For example, if you add three 4 GB add-on licenses you may gain approximately 11 GB memory. However, bear in mind that adding memory may not solve underlying issues with your configuration and the additional memory may not be necessary.
If you add two or three memory add-on licenses, you may see misleading messages such as the following error log message:
%PLATFORM-3-ELEMENT_CRITICAL: R0/0: smand: RP/0: Used Memory value 96% exceeds critical level 93%
A similar high usage value is displayed by a show platform command such as show platform software status control-processor brief . See Example 1 below.
Example 1
In this example a Cisco CSR 1000v running Cisco IOS XE 16.6.2 has 2 x 4 GB memory add-on licenses. The displayed information indicates a critically high memory usage.
# show platform software status control-processor brief
...
Memory (kB)
 Slot  Status    Total     Used (Pct)     Free (Pct) Committed (Pct)
  RP0 Critical 12242316 11775260 (96%)   467056 ( 4%)  12255384 (100%)      << 96% Critical
If you were able to have access to the underlying Linux system you could find that only less memory than 96% is being used. For example, internally the following Linux command shows only 81% usage—based on used memory as a percentage of total memory.
free -m
              total        used        free      shared   buff/cache   available
Mem:          11955        9708          76         758        2169        1383
If you were then to add a third 4 GB add-on license, making a total of three add-on licenses, the 96% memory usage that is displayed by the show platform command would not be significantly reduced.
If you use the show processes memory sorted command, as shown in Example 2 below, you get a better indication of the memory usage.
Example 2
This example shows the difference between using a Cisco CSR 1000v with no add-on licenses, and a Cisco CSR 1000v with two add-on licenses.
-
CSR 1000v with no add-on licenses.
# show processes memory sorted ... Processor Pool Total: 2458193040 Used: 239241616 Free: 2218951424 << 239 MB used -
CSR 1000v with two add-on licenses.
# show processes memory sorted
...
Processor Pool Total: 9625210000 Used: 1231337528 Free: 8393872472    <<  1.2 GB used
This shows that even considering the additional 700 MB extra processing needs, the memory that is being used is quite low. Therefore, using two add-on licenses for this processing requirement may be unnecessary.
Installing Memory Add-on License
Beginning with Cisco IOS XE 3.13S, you can add memory in 4 GB increments to enable control plane scaling using the memory add-on license (L-CSR-MEM-4G=). The following prerequisites apply:
-
The base feature license must be installed.
-
The VM must have enough memory allocated to accommodate the additional memory. For more information, see the table in the section Understanding the Cisco CSR 1000v Memory Allocation in this guide.
SUMMARY STEPS
- Obtain the PAK.
- enable
- show license udi
- Convert the PAK to a license by entering the PAK and the UDI into the Cisco Product License registration portal: http://www.cisco.com/go/license
- show platform software vmemory info
- configure terminal
- platform memory add memory
- end
- license install stored-location-url
- write memory
- reload
- show license detail
- show platform software vmemory info
DETAILED STEPS
| Command or Action | Purpose | |
|---|---|---|
| Step 1 |
Obtain the PAK. |
The PAK is provided to you when you order or purchase the right to use a feature set.
|
| Step 2 |
enable Example: |
Enables privileged EXEC mode.
|
| Step 3 |
show license udi Example: |
Displays all the UDI values that can be licensed in a system.
|
| Step 4 |
Convert the PAK to a license by entering the PAK and the UDI into the Cisco Product License registration portal: http://www.cisco.com/go/license |
After entering the appropriate information, you will receive an e-mail containing the license information that you can use to install the license:
|
| Step 5 |
show platform software vmemory info |
Verifies the current memory allocation on the Cisco CSR 1000v/Cisco ISRv. The display shows the memory upgrade license limit, indicating the maximum amount of additional memory you can add. |
| Step 6 |
configure terminal Example: |
Enters global configuration mode. |
| Step 7 |
platform memory add memory Example: |
Adds the memory allocation to the router to accommodate added memory license(s). Add 4096 MB for each memory license you are planning to install. For example, if you plan to add three memory licenses, you would add 12288 MB of memory. |
| Step 8 |
end Example: |
Exits configuration mode. |
| Step 9 |
license install stored-location-url Example:Example:Example: |
Installs the memory add-on license. |
| Step 10 |
write memory Example: |
Saves the running configuration to NVRAM. |
| Step 11 |
reload Example: |
Restarts the router to enable the memory add-on license to be activated. |
| Step 12 |
show license detail Example: |
Displays the license information to verify the installation of the memory license(s). |
| Step 13 |
show platform software vmemory info Example: |
Verifies the updated memory allocation on the router. |
Example
The following is an example of the show license command with details of a memory add-on license shown:
Router# show license
Index 1 Feature: ax
Index 2 Feature: mem_4G
        Period left: Life time
        License Type: Permanent
        License State: Active, In Use
        License Count: 1/1/0  (Active/In-use/Violation)
        License Priority: Medium
Information About Installing Broadband Feature License
The Cisco CSR 1000v/ Cisco ISR v support the Broadband Network Gateway feature set and the Intelligent Services Gateway feature set. The required broadband feature license (For the Cisco CSR 1000v: L-CSR-BB-1K=) provides up to 4 GB of additional memory and support for up to 1000 broadband sessions.
The following restrictions apply:
-
The APPX feature license with a minimum of 1 Gbps maximum throughput must be installed.
-
You can install multiple broadband feature licenses to increase the number of broadband sessions. However, installing additional broadband feature licenses will not add more memory. To add more memory beyond the 4 GB installed with the first broadband feature license, you must install a separate memory add-on license.
-
If both a broadband feature license and memory add-on licenses are installed, then the broadband license takes higher priority than any memory add-on licenses installed. When the Cisco CSR 1000v/ Cisco ISRv is reloaded, the broadband feature license takes effect first, before any installed memory add-on licenses.
-
We recommend that you install the broadband feature license before installing any memory add-on licenses.
-
The VM must have enough memory allocated to accommodate the additional memory. See Understanding the Cisco CSR 1000v Memory Allocation for more information.
For more information about configuring broadband support, see Broadband Access Aggregation and DSL Configuration Guide and Intelligent Services Gateway Configuration Guide.
Installing Broadband Feature License
SUMMARY STEPS
- Obtain the PAK.
- enable
- show license udi
- Convert the PAK to a license by entering the PAK and the UDI into the Cisco Product License registration portal http://www.cisco.com/go/license
- show platform software vmemory info
- configure terminal
- platform broadband {1K | 2K | 3K | 4K | 5K | 6K | 7K | 8K }
- platform memory add memory
- end
- license install stored-location-url
- write memory
- reload
- show license detail
- show platform software vmemory info
- (Optional) Install memory add-on licenses as needed. For more information, see the Installing a Memory Add-on License section in this guide.
DETAILED STEPS
| Command or Action | Purpose | |||
|---|---|---|---|---|
| Step 1 |
Obtain the PAK. |
The PAK is provided to you when you order or purchase the right to use a feature set.
|
||
| Step 2 |
enable Example: |
Enables privileged EXEC mode.
|
||
| Step 3 |
show license udi Example: |
Displays all the UDI values that can be licensed in a system.
|
||
| Step 4 |
Convert the PAK to a license by entering the PAK and the UDI into the Cisco Product License registration portal http://www.cisco.com/go/license |
After entering the appropriate information, you will receive an e-mail containing the license information that you can use to install the license:
|
||
| Step 5 |
show platform software vmemory info |
Verifies the current memory allocation on the router. The display shows the memory upgrade license limit, indicating the maximum amount of additional memory you can add. |
||
| Step 6 |
configure terminal Example: |
Enters global configuration mode. |
||
| Step 7 |
platform broadband {1K | 2K | 3K | 4K | 5K | 6K | 7K | 8K } Example: |
Adds support for the number of broadband sessions to accommodate the added broadband feature license(s). You can add 1000 sessions for each broadband feature license you are planning to install. For example, if you plan to add two broadband feature licenses, enter the value as 2K. |
||
| Step 8 |
platform memory add memory Example: |
(Optional) Adds the memory allocation to the router to accommodate added memory license(s). Add 4096 MB for each memory license you are planning to install. For example, if you plan to add two memory licenses, add 8192 MB of memory.
|
||
| Step 9 |
end Example: |
Exits configuration mode. |
||
| Step 10 |
license install stored-location-url Example:Example:Example:Example: |
Installs the broadband feature license and any additional memory add-on licenses. |
||
| Step 11 |
write memory Example: |
Saves the running configuration to NVRAM. |
||
| Step 12 |
reload Example: |
Restarts the router to enable the memory add-on license to be activated. |
||
| Step 13 |
show license detail Example: |
Displays the license information to verify the installation of the broadband feature license(s) and memory license(s). |
||
| Step 14 |
show platform software vmemory info |
Verifies the updated memory allocation on the router. |
||
| Step 15 |
(Optional) Install memory add-on licenses as needed. For more information, see the Installing a Memory Add-on License section in this guide. |
Example
The following is an example of the show license command showing details of a broadband feature license:
                        # show license | begin bb
                        Index 76 Feature: bb_1K
                        Period left: Life time
                        License Type: Permanent
                        License State: Active, In Use
                        License Count: 1/1/0  (Active/In-use/Violation)
                        License Priority: Medium
                        Index 77 Feature: mem_4G
Troubleshooting CSL License Issues
Determining the License Status
You can install multiple licenses on a Cisco CSR 1000v/ ISRv. To determine if a license is active, enter the show license or show license detail command. The display indicates the license status. The following are the possible states for the license:
-
Active, In Use
This state indicates that the license is active and is in use by the Cisco CSR 1000v.
-
Active, Not in Use
This state indicates that the license is installed on the Cisco CSR 1000v, but is not currently being used.
-
Inactive
This state indicates that the license is installed on the Cisco CSR 1000v but is no longer valid. For example, a license that has reached the end of the subscription term is shown as inactive.
The following example shows that a Cisco CSR 1000v has two licenses installed: an AX technology license and a Security technology license:
router# show license detail
Index: 1 Feature: ax_1G Version: 1.0 License Type: Paid Subscription Start Date: N/A, End Date: Nov 10 2014 License State: Active, In Use License Count: Non-Counted License Priority: Medium Store Index: 0 Store Name: Primary License StorageIndex: 2 Feature: sec_1G Version: 1.0 License Type: Permanent License State: Active, Not in Use License Count: Non-Counted License Priority: Medium Store Index: 1 Store Name: Primary License Storage
The AX technology license is shown as Active and in use, while the Security technology license is Active but not in use. To use the Security technology license, the license boot level command needs to be configured to “security” and the Cisco CSR 1000v must then be reloaded.
The following example of the show version command shows that the Cisco CSR 1000v has an AX technology license installed, but that the license boot level command has been set to “security”, but the Cisco CSR 1000v has not yet been reloaded.
router# show version | inc Level License Level: ax Next reload license Level: securityMigrating Technology Package Licenses to Cisco IOS XE 3.13S
Starting with Cisco IOS XE 3.13S, the names of the technology package licenses changed as shown below.
-
The Standard technology package was changed to the IPBase technology package.
-
The Advanced technology package was changed to the Security technology package.
-
The Premium technology package was changed to the AX package.
The base feature content for each license is the same as previously, but the names as shown in the licenses and display output have changed. If you migrated either a Standard or Advanced technology package license from a previous version to Cisco IOS XE 3.13S, then the show version and show license commands display the old license names, which is expected behavior. The new license names display when you enter the show running configuration command.
In the following example, the show running configuration command following the migration shows the new “security” technology package :
Router# show running | include level
license boot level security
However, in the show version output, the migrated license displays as the old “advanced” technology package name, as shown in the following example:
Router# show version | include License Level
License Level: advanced
In the show license detail output, the feature license also shows the old advanced license package name, as shown in the following example:
Router# show license detail
Index: 1        Feature: adv_100M                          Version: 1.0
        License Type: Permanent
        License State: Active, In Use
        License Count: Non-Counted
        License Priority: Medium
        Store Index: 0
        Store Name: Primary License Storage
No further configuration is required. To verify the correct feature set name for the migrated license, use the show running configuration command.
Determining the AWS License Type
When you deploy a Cisco CSR 1000v instance from a Cisco CSR 1000v Amazon Machine Image (AMI), the license that is displayed differs depending on whether you deployed a Bring Your Own License (BYOL) or an hourly-usage license.
-
If the show license command shows the license as “advance, internal_service” or a similar designation, then the instance uses an hourly-usage license purchased on Amazon Web Services.
The following example displays the license information for an hourly-usage instance:
router# show license
Index 1 Feature: ax           Index 2 Feature: internal_service
-
If the show license command shows a list of supported licenses with various throughput levels, then the instance is a BYOL instance.
The following example displays the license information for a BYOL instance:
router# show license
Index 1 Feature: advanced
Index 2 Feature: standard
Index 3 Feature: ax
Index 4 Feature: security
Index 5 Feature: lite
Index 6 Feature: appx
Index 7 Feature: ipbase
Index 8 Feature: prem_10M
Index 9 Feature: prem_50M
Index 10 Feature: prem_100M
Index 11 Feature: prem_250M
Index 12 Feature: prem_500M
Index 13 Feature: prem_500M_8G
Index 14 Feature: prem_1G
Index 15 Feature: prem_1G_16G
Index 16 Feature: prem_2500M
Index 17 Feature: prem_5G
Index 18 Feature: prem_10G
Index 19 Feature: prem_200G
Index 20 Feature: ax_10M
Index 21 Feature: ax_50M
Index 22 Feature: ax_100M
Index 23 Feature: ax_250M
Index 24 Feature: ax_500M
Index 25 Feature: ax_500M_8G
Index 26 Feature: ax_1G
-
The license boot level and platform hardware throughput-level commands are not available with hourly-usage license. These commands are only supported on Cisco CSR 1000v instances with BYOL licenses.
Cisco Smart Licensing
| Note |
If you are using CSR1000v release 16.10.1 or later, for Smart Licensing information, refer to the Smart Licensing Guide for Access and Edge Routers. |
Beginning with Cisco IOS XE Release 3.15S, the Cisco CSR 1000v/ Cisco ISRv support activation using Cisco Smart Licensing.
-
To use Cisco Smart Licensing, you must first configure the Call Home feature and obtain Cisco Smart Call Home Services.
-
For Cisco IOS XE 3.15S and later, and IOS XE Denali 16.3 and later, the following Cisco IOS XE technology packages are supported: IPBase, Security, AX and APPX
-
Cisco Smart Licensing uses the Cisco Smart Software Manager for managing licenses. To access the Cisco Smart Software Manager, use the following URL: https://software.cisco.com/#module/SmartLicensing
For more information about Cisco Smart Software Manager, see the Cisco Smart Software Manager User Guide , which is accessible from the Cisco Smart Software Manager tool.
Prerequisites for Cisco Smart Licensing
Before enabling Cisco Smart Licensing on the router, Cisco Smart Call Home must be configured by following the steps in Configuring Call Home for Smart Licensing.
| Note |
For further information on Smart Call Home, see Obtaining Smart Call Home Services and Configuring and Enabling Smart Call Home. |
Configuring Call Home for Smart Licensing
Describes how to configure and activate Call Home specifically for Smart Licensing. This is a prerequisite for configuring Smart Licensing on the Cisco CSR 1000v/ ISRv.
| Note |
For more information in general about configuring Call Home, see Configuring Call Home for the Cisco CSR 1000v. |
Procedure
| Step 1 |
configure terminal Example:Enters configuration mode. |
||
| Step 2 |
service call-home Example:Activates the call-home feature. |
||
| Step 3 |
call-home Example:Enters the Call Home configuration submode. |
||
| Step 4 |
profile name Example:Enters the Call Home destination profile configuration submode for the specified destination profile. If the specified destination profile does not exist, it is created. |
||
| Step 5 |
destination transport-method http Example:Enables the HTTP message transport method. |
||
| Step 6 |
no destination transport-method email Example:Disables email as the transport method. |
||
| Step 7 |
destination address http url url = https://tools.cisco.com/its/service/oddce/services/DDCEService —address of the Cisco Smart Call Home Server. Example:Configures the destination email address or URL to which Call Home messages are sent.
|
Enabling Cisco Smart Licensing
To enable Cisco Smart Licensing and register your device, perform the following steps:
Procedure
| Step 1 |
Execute the configure terminal command. Example:Enters the global configuration mode. |
| Step 2 |
Execute the license smart enable command. Example:This command enables Cisco Smart Licensing and disables Cisco Software Licensing (CSL). |
| Step 3 |
To further establish connectivity, perform the following optional steps:
|
| Step 4 |
exit Example:Exits the configuration mode. |
What to do next
After you enable the Cisco Smart Licensing, the Cisco CSR 1000v instance is no longer in the evaluation mode. The technology level and the throughput level supported by your license takes effect. For more information about managing the technology package and throughput license attributes, see Understanding the License-Based Restriction on Aggregate Bandwidth and Managing Throughput Notifications.
Use the show running-config command to verify whether the Cisco Smart Call Home is enabled. The following configuration should be included:
call-home
  profile "CiscoTAC-1"
  active
  destination transport-method http
  no destination transport-method email
  destination address http https://tools.cisco.com/its/service/oddce/services/DDCEService
Verify that the destination address command points to the URL of the Cisco Smart Software Agent as shown above. If the URL is not configured, you must manually configure the destination address http command to point to the URL.
After the connectivity is established, register the router with the Cisco Licensing Cloud. For example, see the Registering the Router with the Cisco Licensing Cloud section.
Smart Licensing System Messages
This section lists the smart licensing system messages for the Cisco CSR 1000v and Cisco ISRv. The more severe system messages are listed first. For more information on system messages, see System Message Logging. For more information on system logging commands, see the Cisco IOS Configuration Fundamentals Command Reference.
%SMART_LIC-2-PLATFORM_ERROR
Message:
Smart Licensing has encountered an internal software error. Contact TAC: %s
Explanation:
Smart Licensing Agent has encountered an internal problem with the platform.
Recommended Action:
Contact Cisco TAC.
%SMART_LIC-2-XDM_DISPATCH_LOOP_FAILURE
Message:
SmartAgent Admin Init Failed due to failure at XdmDispatchLoop in creating handle
Explanation:
This is an internal error that occurred during scheduler initialization, when trying to create an xdm handle.
Recommended Action:
Contact Cisco TAC.
%SMART_LIC-3-APPHA_DUPLICATED_INSTANCE
Message:
The Application, is trying set HA information for a duplicate instance.
Explanation:
The application is attempting to set the HA information for an entitlement instance (handle) when another duplicate instance already exists (with same entitlement tag, appHaName and appHaInstanceID).
%SMART_LIC-3-PLR_CONFIG_OUT_OF_SYNC
Message:
Trusted Store PLR Enable flag not in sync with System Configuration, TS \%s Config \%s
Explanation:
The Smart Licensing configuration does not match the value of the PLR enable flag in Trusted Store. This can happen if a configuration is copied onto the system and a reload occurs. If the new configuration does not contain the Smart Licensing Enable command, the value in Trusted Store does not match.
Recommended Action:
Apply the desired Smart Licensing PLR Configuration Command and persist the configuration.
%SMART_LIC-3-NOT_AUTHORIZED
Message:
The entitlement \%s in Not Authorized to be used. Reason: \%s
Explanation:
You are using a license without authorization.
Recommended Action:
Go to the Smart Licensing portal to view your entitlements and attempt to find out why you are not authorized to use this license.
%SMART_LIC-3-CONFIG_NOT_SAVED_TSCLEAR
Message:
The smart agent for Licensing will now be disabled because the config was not saved before the reload
Explanation:
During Smart Agent initialization, if the Smart Agent state is registered and the config with the smart license enabled flag was saved before the reboot, then the configuration was not saved before the reload.
Recommended Action:
Save the configuration before reloading.
%SMART_LIC-3-AUTH_RENEW_FAILED
Message:
Authorization renewal with the Cisco Smart Software Manager or satellite : \%s
Explanation:
The Authorization renew request failed. An automatic retry occurs.
Recommended Action:
Please verify your Call Home setting and that the device has connectivity to the Cisco Smart Software Manager or satellite.
%SMART_LIC-3-AGENT_DEREG_FAILED
Message:
Smart Agent for Licensing DeRegistration with Cisco Smart Software Manager or satellite failed: \%s
Explanation:
Smart Licensing De-registration failed. This may have been caused due to a network connection failure to the Cisco Smart Software Manager or satellite. The local registration information on the device has been removed. The registration information on the Cisco Smart Software Manager or satellitehas not been removed
Recommended Action:
Please verify your Call Home setting and that the device has connectivity to the Cisco Smart Software Manager or satellite
%SMART_LIC-3-AGENT_REG_FAILED
Message:
Smart Agent for Licensing Registration with the Cisco Smart Software Manager or satellite failed: %s
Explanation:
Smart Licensing registration failed. Examine the included error string for a more detailed reason for the failure. This could be due to an invalid ID token or if the device is already registered.
Recommended Action:
If the ID token is invalid, it may have expired. Another reason is that you may be using an ID token from Cisco Smart Software Manager but you are registering with a CSSM satellite. If the device is already registered you may use the force option to force the registration with a new ID token. Please verify your Call Home settings and that the device has connectivity to the Cisco Smart Software Manager or CSSM satellite.
%SMART_LIC-3-AGENT_DEREG_FAILED
Message:
Smart Agent for Licensing DeRegistration with Cisco Smart Software Manager or satellite failed: %s
Explanation:
Smart Licensing De-registration failed. This may have been caused by a network connection failure to the Cisco Smart Software Manager or satellite. The local registration information on the device has been removed. The registration information on the Cisco Smart Software Manager or satellite has not been removed.
Recommended Action:
Please verify your Call Home settings and that the device has connectivity to the Cisco Smart Software Manager or satellite.
%SMART_LIC-3-CONVERT_LIC_FAIL
Message:
\%s Failed to convert \%s: \%s
%SMART_LIC-3-UTILITY_REPORT_FAILED
Message:
Smart Agent for Licensing Utility has failed to send usage Report
%SMART_LIC-3-EVAL_EXPIRED
Message:
Evaluation period expired
Explanation:
Your evaluation period has expired. Some features may have restricted usage.
Recommended Action:
You must obtain a new ID token from the Cisco Smart Software Manager or satellite and register the device.
%SMART_LIC-3-OUT_OF_COMPLIANCE
Message:
One or more entitlements are out of compliance
Explanation:
The customer is using a license that they have not purchased or they are using more licenses than they have purchased.
Recommended Action:
You can go to the Smart Licensing portal and view your entitlements, to try and find out why the entitlements are out of compliance.
%SMART_LIC-3-INVALID_ROLE_STATE
Message:
The current role is not allowed to move to the new role: Current \%s New \%s
Explanation:
From the last role event, we can only move to certain roles. The device has moved to a role which the Smart Agent cannot follow.
Recommended Action:
Report this problem to Cisco
%SMART_LIC-3-DEPRECATED_API
Message:
The Deprecated function \%s has been called. This call should be replaced by \%s
Explanation:
This error indicates the Cisco platform team is using deprecated API functions. The platform code is calling a deprecated function. The code needs to be changed to call the new function.
Recommended Action:
Contact Cisco TAC.
%SMART_LIC-3-BAD_MODE
Message:
An unknown mode was specified: \%d
Explanation:
An invalid entitlement enforcement mode was received by the smart agent in the process of logging a syslog message. This is an internal error and should be reported to Cisco.
Recommended Action:
This is a Smart Licensing internal error. Please report this to Cisco TAC.
%SMART_LIC-3-UTILITY_EXPIRED
Message:
Smart Agent for Licensing Utility certificate has expired
Explanation:
Smart Agent for Licensing utility certificate has expired.
%SMART_LIC-3-UTILITY_RENEW_FAILED
Message:
Smart Agent for Licensing Utility certificate renewal failed
Explanation:
Smart Agent for Licensing Utility cert renew failed, this will occur once per day until the renewal is successful or the current certificate expires.
%SMART_LIC-3-INVALID_TAG
Message:
The entitlement tag is invalid: \%s
Explanation:
The entitlement tag for a license is not defined in the Cisco Smart Software Manager. This is a Cisco internal problem and should be reported to Cisco.
Recommended Action:
Report this error to Cisco
%SMART_LIC-3-BAD_NOTIF
Message:
A bad notification type was specified: \%d
Explanation:
This is a Cisco internal error. Report it to Cisco TAC.
Recommended Action:
Report this error to Cisco TAC.
%SMART_LIC-3-AGENT_REG_FAILED
Message:
Smart Agent for Licensing Registration with the Cisco Smart Software Manager or satellite failed: \%s
Explanation:
Smart Licensing registration failed. The included error string should give a more detailed reason for the failure. This may have been due to an invalid ID token or because the device is already registered
Recommended Action:
If the ID token was invalid it may have expired or you may be using an ID token from the Smart Software Manager and you are registering with a satellite. If the device is already registered you can use the force option to force the registration with a new ID token. Please verify your Call Home setting and that the device has connectivity to the Cisco Smart Software Manager or satellite.
%SMART_LIC-3-ID_CERT_EXPIRED
Message:
Registration period has expired. Smart Licensing will transition to the unregistered state. Please re-register this product to correct the problem.
Explanation:
The current time is outside the valid registration period in the ID certificate. This could be caused by a change in the system clock or multiple communications failures with the Cisco Smart Software Manager or satellite.
Recommended Action:
Please check the Smart Call Home settings and network connectivity to the Cisco Smart Software Manager or satellite. Also verify that your system clock is correct.
%SMART_LIC-3-ID_CERT_EXPIRED_WARNING
Message:
This device's registration will expire in \%s.
Explanation:
The registration for this device will expire at the specified time. This usually indicates a communications failure with the Cisco licensing authority.
Recommended Action:
Please verify your Call Home settings and that the device has connectivity to the Cisco Smart Software Manager or satellite.
%SMART_LIC-3-APPHA_DUPLICATED_PEER
Message:
The Application HA Cluster already have a member with given identity. Use the show license usage command to see more details.
Explanation:
When setting up peer informations for an entitlement that supports attribute, the given peer information already exists. One of the devices may not be configured correctly or that the logic that is supposed to remove peer information is not working correctly.
%SMART_LIC-3-RESERVE_HA_FAILURE
Message:
The license reservation information on the active and standby does not match. Licensing HA will not work properly: \%s
Explanation:
The license reservation configuration is not the same on both the active and standby. If the standby takes over as active, you will not have the same licenses available and your device may not work properly.
Recommended Action:
Change the reservation configuration in either of the nodes or both of the nodes so that they match each other.
%SMART_LIC-3-CONFIG_OUT_OF_SYNC
Message:
Trusted Store Enable flag not in sync with System Configuration, TS \%s Config \%s
Explanation:
The Smart Licensing configuration does not match the value of the enable flag in Trusted Store. This can happen if a configuration is copied onto the system and a reload occurs. If the new configuration does not contain the Smart Licensing Enable command, the value in Trusted Store does not match.
Recommended Action:
Apply the desired Smart Licensing Configuration Command and persist the configuration.
%SMART_LIC-3-REG_EXPIRED_CLOCK_CHANGE
Message:
Smart Licensing registration has expired because the system time was changed outside the validity period of the registration period. The agent will transition to the un-registered state in 60 minutes.
Explanation:
The system clock has been changed so that it is now outside the valid registration period. If the clock is reset to a value inside the registration validity period of 1 hour, smart licensing continues to function normally. If the clock is not reset, the device becomes de-registered and a new id token must be obtained to re-register the device. The registration validity period is defined by the start and end date in the ID certificate. Use the show license tech support command to get the ID certificate information.
Recommended Action:
Set the system clock back to the correct date and time.
%SMART_LIC-3-ROOT_CERT_MISMATCH_PROD
Message:
Certificate type mismatch
Explanation:
Smart Agent received an incorrect certificate for validation. Please contact your product support team.
%SMART_LIC-3-APPHA_MISSING_PEER
Message:
The Application HA Cluster do not have a member with given identity. Use the 'show license usage' command to see the exact error.
Explanation:
When removing peer information for an entitlement that supports the attribute, the given peer information does not exist. This means that one of the devices may not be configured correctly or that the logic that is supposed to add/update peer information is not working correctly.
%SMART_LIC-3-APPHA_ADD_ITSELF
Message:
The Application, is trying to add itself as its own Application HA peer.
Explanation:
When adding peer information for an entitlement that supports an attribute, the peer information contains the same data as its own HA attribute. This means that it has tried to add itself as its own peer.
%SMART_LIC-3-CERTIFICATE_VALIDATION
Message:
Certificate validation failed by smart agent: \%s
Explanation:
The ID certificate validation failed during a reboot, registration or renewal. The included error message should give more information about the failure.
%SMART_LIC-3-HOT_STANDBY_OUT_OF_SYNC
Message:
Smart Licensing agent on hot standby is out of sync with active Smart Licensing agent
Explanation:
The Smart Licensing Agent on hot standby failed to process the data necessary to stay in sync with the active agent. If a switch over occurs the the new active agent will not be in the same state as the current active agent. The configuration does not match the value of the enable flag in Trusted Store. This can happen if a configuration is copied onto the system and a reload occurs. If the new configuration does not contain the Smart Licensing Enable command, the value in Trusted Store will not match.
%SMART_LIC-3-ENTITLEMENT_RENEW_FAILED
Message:
Entitlement authorization with Cisco licensing cloud failed: \%s
Explanation:
The device has failed to communicate with Cisco to renew the entitlement authorization.
Recommended Action:
Please verify your Call Home setting and that the device has connectivity to the Cisco Smart Software Manager or satellite
%SMART_LIC-3-COMM_FAILED
Message:
Communications failure with the Cisco Smart Software Manager or satellite : \%s
Explanation:
The device communication with the Cisco Smart Software Manager or satellite failed.
Recommended Action:
Please verify your Call Home setting and that the device has connectivity to the Cisco Smart Software Manager or satellite
%SMART_LIC-3-CONVERT_FAILED
Message:
\%s License conversion failed: \%s
%SMART_LIC-3-ID_CERT_RENEW_NOT_STARTED
Message:
ID certificate start date not reached yet
Explanation:
The device registration failed. The ID Certificate start date is later than the device current time.
Recommended Action:
Please adjust your device clock to be correct, and retry the registration again.
%SMART_LIC-3-ID_CERT_RENEW_FAILED
Message:
Automatic registration renewal failed: \%s
Explanation:
The automatic ID certificate renewal failed. The included error message should give a better idea of what the failure was.
Recommended Action:
Please verify your Call Home setting and that the device has connectivity to the Cisco Smart Software Manager or satellite
%SMART_LIC-3-EVAL_EXPIRED_WARNING
Message:
Evaluation period expired on \%s
Explanation:
The device evaluation period will expire in the specified amount of time.
Recommended Action:
Register this device with the Cisco Smart Software Manager or satellite before the evaluation period expires.
%SMART_LIC-3-ROOT_CERT_MISMATCH_DEV
Message:
Certificate Mismatch: Development \%s Certificate being used with a Production Root Certificate. Use the 'test license smart dev-cert enable' CLI to set the DEV root cert.
Explanation:
The Production Root Certificate is being used with Development certificates.
Recommended Action:
Please activate the Development Root Certificate from the CLI. (ie. ‘test license smart dev-cert enable’)
%SMART_LIC-4-CONFIG_NOT_SAVED
Message:
Smart Licensing configuration has not been saved
Explanation:
This is an informational message to remind you to save the configuration.
Recommended Action:
Save the configuration.
%SMART_LIC-4-HANDLE_ATTR_VERSION_MISMATCH
Message:
The handle attribute version between two devices are different. \%s
Explanation:
The devices inside a cluster do not have the same operational capability. This is not an issue if all devices only use the functionality that all members of a cluster support. However, it is good practice to have all devices in a cluster using the same software version.
%SMART_LIC-4-RESERVE_IN_PROGRESS
Message: License Reservation process must be completed with the 'license smart reservation install' command. Reservation started on %s
Recommended Action:
You must obtain a reservation authorization code from Cisco Smart Software Manager and install it on the device.
%SMART_LIC-4-IN_OVERAGE
Message: One or more entitlements are in overage
Explanation:
This is for information only. No action is necessary. You are still in compliance and within the overage amount as specified in your contract.
Recommended Action:
This message is informational only and no action is required.
%SMART_LIC-4-SMART_TRANSPORT_NOT_CONFIG
Message: Smart Agent for Licensing Smart transport is not configured for utility reporting
Explanation:
Smart Agent for Licensing Utility is enabled and there is a subscription, but Smart transport is not configured.
%SMART_LIC-4-UTILITY_FQDN_MISMATCH
Message:
Smart Agent for Licensing Utility URL setting does not match the FQDN in the utility certificate.
Explanation:
The Smart Agent for Licensing Smart licensing URL must match the FQDN embedded in the utility certificate.
Recommended Action:
Obtain a new utility certificate from Cisco.
%SMART_LIC-4-EVAL_WILL_EXPIRE_WARNING
Message:
Evaluation period will expire in \%s.
Explanation:
The device is operating within the evaluation period and this period ends in the specified amount of time.
Recommended Action:
Register this device with the Cisco Smart Software Manager or satellite before the evaluation period ends.
%SMART_LIC-4-EVAL_WILL_EXPIRE_WARNING
Message:
Evaluation period will expire in \%s.
Explanation:
The device is using the evaluation period which will expire in the specified time
Recommended Action:
Register this device with the Cisco Smart Software Manager or satellite before the evaluation period expires.
%SMART_LIC-5-IN_COMPLIANCE
Message: All entitlements and licenses in use on this device are authorized.
Explanation:
All your requested entitlements are authorized by Cisco licensing services.
Recommended Action:
This message is informational only and no action is required.
%SMART_LIC-5-COMM_RESTORED
Message:
Communications with the Cisco Smart Software Manager or satellite restored
Explanation:
Smart Agent communication with the Cisco Smart Software Manager or satellite has been restored.
Recommended Action:
This is informational only and no action is required
%SMART_LIC-5-SYSTEM_CLOCK_CHANGED
Message:
Smart Agent for Licensing System clock has been changed
Explanation:
The system clock has changed and the Smart Agent for Licensing has updated its internal timers
Recommended Action:
This is informational only and no action is required
%SMART_LIC-5-UTILITY_RENEW_SUCCESS
Message:
Smart Agent for Licensing Utility certificate renewal successful
%SMART_LIC-5-IN_COMPLIANCE
Message:
All entitlements and licenses in use on this device are authorized
Explanation:
All customer requested entitlements are authorized by Cisco licensing services.
Recommended Action:
This is informational only and no action is required
%SMART_LIC-5-EVAL_START
Message:
Entering evaluation period
Explanation:
The device is not registered with the Cisco Smart Software Manager or satellite and is using licenses. An evaluation period of 90 days is available
Recommended Action:
Register this device with the Cisco Smart Software Manager or satellite using an ID token
%SMART_LIC-5-COMM_INIT_FAILED
Message:
Failed to initialize communications with the Cisco Smart Software Manager or satellite: \%s
Explanation:
Smart Agent could not initialize communication with the Cisco Smart Software Manager or satellite.
Recommended Action:
Please verify your Call Home setting and check that the device has connectivity to the Cisco Smart Software Manager or satellite.
%SMART_LIC-5-AUTHORIZATION_EXPIRED
Message:
Authorization period expired
Explanation:
The device has not communicated with the Cisco Smart Software Manager or satellite for 90 days and the device has not automatically renewed the entitlement authorizations. Some features may restrict functionality
Recommended Action:
Please verify your Call Home setting and that the device has connectivity to the Cisco Smart Software Manager or satellite
%SMART_LIC-6-ID_CERT_RENEW_SUCCESS
Message:
Automatic registration renewal successful
Explanation:
Customer ID certificate has been renewed successfully
Recommended Action:
This is informational only and no action is required
%SMART_LIC-6-DISABLED
Message:
Smart Agent for Licensing disabled
Explanation:
Smart Agent has been disabled from either the CLI orbecause of a configuration mismatch
%SMART_LIC-6-AUTH_RENEW_SUCCESS
Message:
Authorization renewal with the Cisco Smart Software Manager or satellite. State=\%s
Explanation:
The automatic authorization renewal was successful
Recommended Action:
This is informational only and no action is required
%SMART_LIC-6-HA_ROLE_CHANGED
Message:
Smart Agent HA role changed to \%s.
Explanation:
Smart Agent role on HA RP has been changed to either active or standby.
Recommended Action:
This is informational only and no action is required
%SMART_LIC-6-HA_CHASSIS_ROLE_CHANGED
Message:
Smart Agent HA chassis role changed to \%s.
Explanation:
Smart Agent chassis role on HA has been changed to either active or standby.
Recommended Action:
This is informational only and no action is required
%SMART_LIC-6-AGENT_ALREADY_REGISTER
Message:
This device is already registered with the Cisco Smart Software Manager or satellite.
Explanation:
Smart Licensing on this device has already registered with the Cisco Smart Software Manager or satellite
Recommended Action:
Use the force option when registering or remove this device from your virtual account on the Cisco Smart Software Manager or satellite
%SMART_LIC-6-AGENT_ALREADY_DEREGISTER
Message:
Smart Agent is already Deregistered with the CSSM.
Explanation:
Smart Licensing has already de-registered with Cisco.
%SMART_LIC-6-EXPORT_CONTROLLED
Message:
Usage of export controlled features is \%s
Explanation:
This tells you if you are allowed to use export controlled features.
Recommended Action:
This is informational only and no action is required.
%SMART_LIC-6-HOSTNAME_MATCHED_UDI
Message:
The host name has been changed to match a field in the device identifier (UDI).Since the device identifier is sent to Cisco this may bypass your host name privacy settings
Explanation:
The host name has been changed to match a field in the device identifier (UDI). Since the device identifier is sent to Cisco this may bypass your host name privacy settings.You can view the device identifier using the command: show license udi .
Recommended Action:
Change the host name so it does not include any fields in the device identifier.
%SMART_LIC-6-RESERVED_INSTALLED
Message:
\%s License Reservation Authorization code installed
Recommended Action:
This is informational only and no action is required.
%SMART_LIC-6-ENTITLEMENT_RENEW_SUCCESS
Message:
Entitlement authorization renewal with Cisco licensing cloud successful
Explanation:
Authorization renewal request is successful.
Recommended Action:
This is informational only and no action is required
%SMART_LIC-6-RESERVE_RETURNED
Message:
\%s License Reservation returned. Smart Agent is now unregistered.
Recommended Action:
This is informational only and no action is required.
%SMART_LIC-6-RESERVE_CANCELED
Message:
\%s License Reservation request canceled. Smart Agent is now unregistered.
Explanation:
Sent when you cancel a reservation request by using the reservation cancel command.
Recommended Action:
This is informational only and no action is required
%SMART_LIC-6-RESERVE_AUTH_FAILED
Message:
Failed to validate the \%s Reservation Authorization Code. Changing to the unregistered state.
Explanation:
The reservation authorization code is not valid on this device
%SMART_LIC-6-RESERVE_HA_MISMATCH
Message:
The reserved licenses on the active and standby do not match. Use the show license status command to see the error details.
Explanation:
The Licenses reserved using the Specified License Reservation (SLR) feature in Smart Licensing and installed on the active and standby or member devices in an HA configuration are not the same. If the standby takes over as active you will not have the same licenses available and your device may not work properly.
%SMART_LIC-6-PLR_DISABLED_INIT_COMM
Message:
Permanent License Reservation has been disabled. Please reboot the system to initialize Smart Licensing communications with Cisco.
Explanation:
During bootup, Smart Licensing communication is not initialized if Permanent License Reservation (PLR) is enabled. To enable Smart Licensing communication with Cisco when PLR is disabled, the system needs to be rebooted.
%SMART_LIC-6-CONVERT_START
Message:
Smart License Conversion has started
%SMART_LIC-6-CONVERT_LIC_SUCCESS
Message:
\%s License \%s has been converted to \%s with a count of \%d
%SMART_LIC-6-CONVERT_LIC_ALREADY
Message:
\%s License \%s has been converted to \%s with a count of \%d
%SMART_LIC-6-CONVERT_SUCCESS
Message:
\%s Smart License Conversion successful
%SMART_LIC-6-CONVERT_ALREADY
Message:
\%s Smart License Conversion successful
%SMART_LIC-6-THIRDPARTY_MODE_ENABLED
Message:
Smart Agent for Licensing is in Thirdparty Mode
Explanation:
Smart Agent for Licensing is in thirdparty mode, and ready to collect and process RUM reports
%SMART_LIC-6-THIRDPARTY_MODE_DISABLED
Message:
Smart Agent for Licensing is out of Thirdparty Mode
Explanation:
Smart Agent for Licensing is out of thirdparty mode, and has stopped collecting and processing RUM reports.
%SMART_LIC-6-UTILITY_STARTED
Message:
Smart Agent for Licensing Utility has started sending usage reports
Explanation:
Smart Agent for Licensing utility has been enabled and is sending usage reports.
%SMART_LIC-6-UTILITY_STOPPED
Message:
Smart Agent for Licensing Utility has stopped sending usage reports: \%s
Explanation:
Smart Agent for Licensing Utility is not available and no longer sending usage reports.
%SMART_LIC-6-AGENT_READY
Message:
Smart Agent for Licensing is initialized
Explanation:
Smart Agent for Licensing is fully initialized and ready for use.
Recommended Action:
This is informational only and no action is required
%SMART_LIC-6-AGENT_ENABLED
Message:
Smart Agent for Licensing is enabled
Explanation:
Smart Agent for Licensing is enabled and ready to process licensing requests.
Recommended Action:
This is informational only and no action is required
%SMART_LIC-6-AGENT_REG_SUCCESS
Message:
Smart Agent for Licensing Registration with the Cisco Smart Software Manager or satellite
Explanation:
Smart Licensing registration was successful.
%SMART_LIC-6-AGENT_DEREG_SUCCESS
Message:
Smart Agent for Licensing De-registration with the Cisco Smart Software Manager or satellite was successful
Explanation:
Smart Licensing de-registration successful.
Recommended Action:
This is informational only and no action is required
%SMART_LIC-7-DAILY_JOB_TIMER_RESET
Message:
Daily job timer reset
Explanation:
This message is used only for testing and does not indicate an error
Recommended Action:
This is informational only and no action is required
Registering the Router with the Cisco Licensing Cloud
| Note |
If you are registering the router and using CSSM satellite, go to the following section instead: Registering the Router with the Cisco Licensing Cloud (CSSM satellite). |
After you have enabled Cisco Smart Licensing, you must register the router with Cisco. Using the ID token, the license agent on the router registers the product with Cisco and then receives back an identity certificate. This certificate is used for all future communications with Cisco. The license agent on the router automatically renews the registration information with Cisco every 30 days. This registration step is performed once for each product instance.
Procedure
| Command or Action | Purpose |
|---|---|
|
license smart register idtoken id-token Example: |
Registers the device instance with the Cisco licensing cloud. This step only needs to be performed once per device instance. The license agent registers the product with Cisco and receives back an identity certificate. This certificate is saved and automatically used for all future communications with Cisco. The license agent automatically renews the registration information with Cisco every 30 days. |
| Note |
Smart licensing may fail when IPv6 is configured on any interface and the device does not have IPv6 connectivity to the Internet or the Cisco Smart Software Agent at tools.cisco.com, resulting in log file error messages such as those shown below. (Note that these messages may also appear as a result of other conditions being true.) If connectivity failed due to this issue, see Re-establishing Connectivity to the Cisco Smart Call Home Server when IPv6 is Configured. |
What to do next
Go to Requesting Cisco Smart License Throughput Level Licenses.
Registering the Router with the Cisco Licensing Cloud (CSSM satellite)
| Note |
If you are registering the router and using CSSM satellite, go to the following section instead: Registering the Router with the Cisco Licensing Cloud. |
After you have enabled Cisco Smart Licensing, you must register the router with Cisco. Using the ID token, the license agent on the router registers the product with Cisco and then receives back an identity certificate. This certificate is used for all future communications with Cisco. The license agent on the router automatically renews the registration information with Cisco every 30 days. This renewal of registration is done once for each product instance. See http://www.software.cisco.com to determine the id-token.
SUMMARY STEPS
- profile CiscoTAC-1
- no destination address http default-url
- destination address http satellite-url
- exit
- crypto pki trustpoint SLA-TrustPoint
- revocation-check none
- exit
- license smart register idtoken id-token
DETAILED STEPS
| Command or Action | Purpose | |
|---|---|---|
| Step 1 |
profile CiscoTAC-1 Example: |
Enables TAC profile configuration mode. |
| Step 2 |
no destination address http default-url Example: |
Removes the previously configured destination address for the Cisco Smart Software Agent. |
| Step 3 |
destination address http satellite-url |
|
| Step 4 |
exit |
Exits TAC profile configuration mode. |
| Step 5 |
crypto pki trustpoint SLA-TrustPoint |
Starts ca-trustpoint configuration mode and create a name, SLA-Trustpoint, for the CertificateAuthority server. |
| Step 6 |
revocation-check none |
Certificate checking is ignored. Use this command if you are configuring software using Cisco Smart Software Manager satellite (CSSM satellite). This command ensures that revocation checking of the certificate is disabled when the trust policy is in use. |
| Step 7 |
exit |
Exits ca-trustpoint configuration mode and returns to global configuration mode. |
| Step 8 |
license smart register idtoken id-token Example:The system now contacts the Cisco Smart Licensing servers to obtain authorization for Smart Licensing |
Registers the device instance with the Cisco licensing cloud. This step only needs to be performed once per device instance. The license agent registers the product with Cisco and receives back an identity certificate. This certificate is saved and automatically used for all future communications with Cisco. The license agent automatically renews the registration information with Cisco every 30 days. |
What to do next
Go to Requesting Cisco Smart License Throughput Level Licenses
Re-establishing Connectivity to the Cisco Smart Call Home Server when IPv6 is Configured
This section describes what to do if there is a failure to connect to the Cisco Smart Call Home Server when IPv6 is configured, as mentioned previously in Enabling Cisco Smart Licensing.
To re-establish connectivity with the Cisco Smart Call Home Server, use one of the following two methods, depending on the version of Cisco IOS XE that you are using:
If you are using one of the following recent versions of Cisco IOS XE: 3.16.6, Denali 16.3.4 and later, Everest 16.4.2 and later, Everest 16.5.1 and later, see Re-establishing Connectivity.
Note that in some cases, after configuring the previous steps, you may need to restart the router to fully re-establish connectivity.
Re-establishing Connectivity
This method applies to the following Cisco IOS XE releases: Cisco IOS XE 3.16.6, Cisco IOS XE Denali 16.3.4 and later, Everest 16.4.2 and later, and Everest 16.5.1 and later.
If there is an IPv6 address on an interface and the device cannot connect to the Internet or Smart software agent, configure the interface to only use IPv4 for smart licensing, with the following configuration mode command:
Procedure
|
ip http client source-interface interface Example:Router(config)# ip http client source-interface GigabitEthernet1
Configures the interface to use IPv4.
|
Requesting Cisco Smart License Throughput Level Licenses
Request a license corresponding to the configured technology package level and throughput level.
Prerequisites
Register the device with the Smart License server.
Changing Throughput Licenses
When working with Cisco Smart Licenses, using the platform hardware throughput level command requests a license for the new throughput level. Typically, the activation process requires several minutes. During this time, the new license remains “pending.”
Before the Cisco IOS XE 3.17 release, when changing throughput, the effective throughput would drop to 100 kbps while the new throughput license was pending. When the new license was activated, throughput would change to the newly configured level.
Beginning in the Cisco IOS XE 3.17 release, and including Cisco IOS XE Denali 16.2 and later, the transition is smoother. The router maintains the original throughput level until the license for the new throughput is activated.
In the following example, the router has been authorized previously for a throughput of 100M. The first line in the example is a request for a 250M throughput license. While the request is pending, the show license all command indicates the current authorized level (100M) and the pending license (250M), both shown in bold.
ultra-mcp(config)#platform hardware throughput level MB 250
Wait for 250M license request to succeed, continue to use existing 100M license until then
ultra-mcp(config)#end
ultra-mcp#show license all
Smart Licensing Status
======================
Smart Licensing is ENABLED
Registration:
  Status: REGISTERED
  Smart Account: CSR1000v
  Virtual Account: AX_SEC_IPB
  Export-Controlled Functionality: Allowed
  Initial Registration: SUCCEEDED on Nov 06 11:59:12 2015 UTC
  Last Renewal Attempt: None
  Next Renewal Attempt: May 04 11:59:11 2016 UTC
  Registration Expires: Nov 05 11:56:09 2016 UTC
License Authorization:
  Status: AUTHORIZED on Nov 09 13:37:00 2015 UTC
  Last Communication Attempt: SUCCEEDED on Nov 09 13:37:00 2015 UTC
  Next Communication Attempt: Nov 09 13:39:20 2015 UTC
  Communication Deadline: Feb 07 13:33:58 2016 UTC
License Usage
==============
regid.2014-05.com.cisco.ax_100M
,1.0_2fff5ed6-e23c-455d-ade3-83ba3c8ed890 (ax_100M):
  Description:
  Count: 1
  Version: 1.0
  Status: AUTHORIZED
(ax_250M
):
  Description:
  Count: 1
  Version: 1.0
  Status: PENDING

Product Information
===================
UDI: PID:CSR1000v,SN:9R8ORIT8CB0
Agent Version
=============
Smart Agent for Licensing: 1.4.0_rel/28
Component Versions: SA:(1_4_rel)1.1.7, SI:(rel22)1.1.0, CH:(rel5)1.0.1, PK:(rel18)1.0.0
SUMMARY STEPS
- configure terminal
- license boot level {ipbase | security | ax | appx }
- platform hardware throughput level MB {10 | 100 | 1000 | 10000 | 250 | 2500 | 50 | 500 | 5000 }
DETAILED STEPS
| Command or Action | Purpose | |
|---|---|---|
| Step 1 |
configure terminal |
Enter config mode. |
| Step 2 |
license boot level {ipbase | security | ax | appx } |
Specify the technology package level. |
| Step 3 |
platform hardware throughput level MB {10 | 100 | 1000 | 10000 | 250 | 2500 | 50 | 500 | 5000 } |
Configure the throughput level for the license to request. |
Requesting Memory Add-on License
For information about memory add-on licenses, see Understanding the Cisco CSR 1000v Memory Allocation. For Cisco Smart Licensing, the procedure for requesting the license is as follows:
SUMMARY STEPS
- configure terminal
- platform memory add memory
- show platform software vmemory info
DETAILED STEPS
| Command or Action | Purpose | |
|---|---|---|
| Step 1 |
configure terminal |
Enter config mode. |
| Step 2 |
platform memory add memory |
|
| Step 3 |
show platform software vmemory info |
Verifies the updated memory allocation. |
Requesting Smart License Broadband license
For information about broadband licenses, see Information About Installing Broadband Feature License and Installing Broadband Feature License. For Cisco Smart Licensing, the procedure for requesting the license is as follows:
SUMMARY STEPS
- configure terminal
- platform broadband {1K | 2K | 3K | 4K }
DETAILED STEPS
| Command or Action | Purpose | |
|---|---|---|
| Step 1 |
configure terminal |
Enter config mode. |
| Step 2 |
platform broadband {1K | 2K | 3K | 4K } Example: |
Adds support for the number of broadband sessions to accommodate the added broadband feature license(s). You can add 1000 sessions for each broadband feature license you are planning to install. For example, if you plan to add two broadband feature licenses, enter the value as 2K. |
Manually Renewing the ID Certificate
By default, the ID certificate is automatically renewed every 6 months. You can manually renew the ID certificate using this procedure.
This may be useful in either of the following circumstances:
-
If you have a limited window of Internet access
-
After making licensing changes in the Smart Software Manager
SUMMARY STEPS
- license smart renew id
DETAILED STEPS
| Command or Action | Purpose |
|---|---|
|
license smart renew id Example: |
Renews the ID certificate. |
Manually Renewing the License
By default, the license (also called “entitlement”) is automatically renewed every 30 days. You can manually renew the license using this procedure.
This may be useful in either of the following circumstances:
-
Only a limited window of Internet access is available.
-
After making licensing changes in the Smart Software Manager.
| Note |
The terms “license” and “entitlement” are equivalent and are used interchangeably. |
SUMMARY STEPS
- license smart renew auth
DETAILED STEPS
| Command or Action | Purpose |
|---|---|
|
license smart renew auth Example: |
Renews the license (also called “entitlement”). |
Unregistering a Device from Cisco Smart Licensing
SUMMARY STEPS
- license smart deregister
DETAILED STEPS
| Command or Action | Purpose |
|---|---|
|
license smart deregister |
Removes the Cisco Smart Licensing registration for the device instance. All Cisco Smart Licensing certificates are removed on the router and the entitlements are released from the Smart Call Home backend server. |
Disabling Cisco Smart Licensing
Describes how you can disable Cisco Smart Licensing and switch back to standard Cisco Software Licensing (CSL) mode.
SUMMARY STEPS
- no license smart enable
- reload
DETAILED STEPS
| Command or Action | Purpose | |
|---|---|---|
| Step 1 |
no license smart enable |
Disables Cisco Smart Licensing on the device instance and switches to Cisco Software Licensing (CSL) mode. Reboot the device for the change to take effect. Note : When you disable Smart Licensing, the Cisco Software License (CSL) and all licensing calls pass through the Smart Agent. For the no case, if Smart Licensing is already registered, the Smart Agent performs the license smart deregister operation that deactivates Smart Licensing. |
| Step 2 |
reload |
Restarts the router. This is required to complete the process of disabling the Cisco Smart License. |
License Out-of-Compliance Behavior
A successfully licensed router may receive an “out of compliance” syslog message during reload or renewal/reauthorization of license from the Smart Licensing server if an attempt is made to contact the Smart Licensing server for a license and the number of available licenses recorded on the Smart Licensing account is exceeded. This message may also occur as a result of the router having been configured to have a higher performance level compared to the previously purchased feature set.
After the “out of compliance” message appears, the system continues to operate at the previously licensed throughput rate.
License Behavior with no Connectivity to the Smart Licensing Server
When a successfully licensed Cisco CSR 1000v/Cisco ISRv is unable to contact the Smart Licensing server, during reload or reauthorization or renewal of license, then the router continues to operate at the previously licensed state.
The license authorization expires if the CSSM satellite server has had no connectivity with the Smart Licensing server for more than 90 days. The license then changes to a License Authorization Expired State and the router continues to operate at the previously licensed state and runs in the Feature Restricted mode.
The following example shows a typical license expiry message that appears on the console.
*Aug 4 08:02:19.056: %VXE_THROUGHPUT-6-CLI_RESTRICTED_LICENSE_EXPIRE: System is in
feature restricted mode due to license expire. Configuration CLIs have been blocked.
nvram:startup-config is write protected (read-only). Valid license and reboot is required to recover
from this state. Use configuration CLI - platform hardware throughput restricted-throughput-rate-mode
if startup-config changes are needed.
In the Feature Restricted mode, the feature configuration commands are blocked except for those commands that are needed for licensing. Also, the commands for setting the technology features and the throughput rate are available.
| Note |
In the Feature Restricted mode you cannot save or write the running configuration. However, starting from the 17.1.1 release, you can execute the copy command except while copying to statup config/NVRAM, as startup configuration is write protected. From the 17.1.1 release, when your device is in the Feature Restricted mode, if the hostname was previously Router#, it changes to (restricted)Router#. Renew your license to move out of the Feature Restricted mode. |
Example 1
This example shows that if you enter a write command an error message appears.
router# write
nvram config write protectedExample 2.
This example shows that if you enter a reload command an error message appears.
router# reload
System configuration has been modified. Save? [yes/no]: yes nvram config write protectedProceed with reload? [confirm]After you confirm by pressing Enter and proceed with the reload, the existing configuration is retained and the router continues to run. Note that the existing configuration cannot be modified.
If you further attempt to authorize or renew licenses with the Smart Licensing server, and if communication cannot be achieved with the Smart Licensing server (e.g, after rebooting the router), the syslog messages about being in the Feature Restricted mode, are generated. The following example displays this scenario:
*Aug 4 08:02:19.056: %VXE_THROUGHPUT-6-CLI_RESTRICTED_LICENSE_EXPIRE: System is in feature restricted mode due to communication fault to license server.
Configuration CLIs have been blocked. nvram:startup-config is write protected (read-only).
Valid license and reboot is required to recover from this state.
Use configuration CLI - platform hardware throughput restricted-throughput-rate-mode
if startup-config changes are needed.router(config)# platform hardware throughput restricted-throughput-rate-modeAfter you enter the platform hardware throughput restricted-throughput-rate-mode command, the system displays the following message:
% The config will take effect on next reboot. This device will need to be re-licensedAfter the next reload, the throughput rate restricted mode is in operation, and the traffic throughput rate is 100 Kbps.
When the modification of the start-up configuration is disabled, changes you make (such as registering a new license or configuring the license server connectivity) in the Feature Restricted mode are lost if you reboot the router. The router then returns to the Feature Restricted mode. If you use the platform hardware throughput restricted-throughput-rate-mode command, recovery is possible as you can use the configuration commands that are required to restore the router license.
If the configuration commands to renew licensing are not required, you can reboot the Cisco CSR 1000v / Cisco ISRv instance. The device communicates with the Smart Licensing server and then pre-existing licenses are renewed.
Activating Permanent License Reservation
Introduction to Activating Permanent License Reservation
Activating a license using Permanent License Reservation (PLR) allows a device to use a license without having to be connected to Cisco Smart Software Manager (CSSM) or CSSM satellite. This feature is available using release Cisco IOS XE Everest 16.5.1a or later.
Activating Permanent License Reservation
This process describes how to activate permanent license reservation (PLR), which allows a product instance or device to have universal entitlement to a license. After activating PLR, the device does not need to communicate with Cisco Smart Software Manager(SSM) or a Cisco SSM server to maintain its ability to use features associated with a license. The license will not become out of compliance.
Procedure
| Command or Action | Purpose | |||
|---|---|---|---|---|
| Step 1 |
configure terminal |
Enter global configuration mode on the device onto which you want to install a license using PLR. |
||
| Step 2 |
license smart enable |
Enable smart licensing. |
||
| Step 3 |
license smart reservation |
Enables reservation mode. |
||
| Step 4 |
end |
|||
| Step 5 |
license smart reservation request universal |
Make a note of the request code. |
||
| Step 6 |
Log into Cisco Smart Software Manager (SSM) and navigate to the virtual account that contains the licenses that you need. |
|
||
| Step 7 |
In Cisco SSM, in the Licenses tab, click License Reservation and enter the request code obtained in Step 5. The authorization code is displayed on the screen (short ASCII character string). |
|||
| Step 8 |
Make a note of the authorization code. |
The authorization code is securely tied to the Universal Device Identifier (UDI) of the device. |
||
| Step 9 |
Enter global config (EXEC) mode on the device where you want to activate PLR. |
|||
| Step 10 |
license smart reservation install auth-code |
(auth-code is the authorization code obtained in Step 7.) PLR is now active. This reservation is permanent until it is manually returned or deactivated after it is no longer required. |
||
| Step 11 |
platform hardware throughput level MB throughput |
Set the throughput level (MB) (Range 10 to 10000). |
What to do next
Later, to return or deactivate PLR, see Deactivating Permanent License Reservation.
Deactivating Permanent License Reservation
Follow these steps to deactivate (return) Permanent License Reservation (PLR). For example, if you want to change the licensing on the device and save the cost of using PLR.
Procedure
| Step 1 |
Enter EXEC mode. |
||
| Step 2 |
license smart reservation return {auth-code}
This command generates a reservation return code. Example: |
||
| Step 3 |
Make a note of the return code. |
||
| Step 4 |
In CSSM, log in and navigate to the Product Instances tab for the virtual account in which the product is registered. Locate the entry that matches the Unique Device Identifier (UDI) of the device that you want to remove from the list. |
||
| Step 5 |
Select Actions, click Remove Product Instance. Cisco SSM removes the product instance. |
||
| Step 6 |
Paste the return code and click Remove. The device is unregistered and operates with a default throughput of 1 Mbps. |
Enabling Utility Reporting
Utility Reporting—Overview
Utility Reporting allows you to pay for features based on usage, instead of paying in advance for feature licenses. Utility Reporting is available for the Cisco CSR 1000v or Cisco ISRv using Cisco IOS XE Fuji 16.8.1 or higher.
Utility Reporting collects usage data from products that have Cisco Smart Licensing and Utility Reporting enabled and sends the usage data via the CSSM satellite to the Cisco Service Billing Platform (SBP), which produces daily reports. Usage data is produced in the Resource Utilization Measurement (RUM) format (ISO/IEC 19770-4).
The device collects usage data every 15 minutes and sends it to the CSSM satellite every four hours. Every 8 hours the CSSM satellite sends data to the Cisco SBP. The device stores usage data for up to 30 days and the CSSM satellite saves data for 90 days. This data backup allows recovery after, for example, the CSSM satellite becomes disconnected from the Cisco SBP. If there is a lack of connection for more than 30 days, the Cisco accounts team should contact you to communicate any issues.
Utility Reporting—Prerequisites
Before enabling Utility Reporting, perform the following steps:
-
Add the licensese that are going to be used for utility reporting (using a post-payment method) into a smart account. For example, see Smart Software Licensing Overview.
-
Enable Smart Licensing on the device.
Summary steps: configure terminal license smart enable exitSee Enabling Cisco Smart Licensing, in this document.
-
Install and configure CSSM satellite. For further information, see Smart Software Manager satellite.
-
Register the device. For further information, see Registering the Router with the Cisco Licensing Cloud (CSSM satellite), in this document.
How to Enable Utility Reporting
Procedure
| Step 1 |
configure terminal Enters the global configuration mode. |
| Step 2 |
license smart utility Registers your intention to use the Utility Reporting feature on the device. Use the “no” form of this command, Example: |
| Step 3 |
license smart transport smart Sets the transport type as Example: |
| Step 4 |
license smart url registration-url Sets the URL to be used by the smart transport between the smart agent and the CSSM or the CSSM satellite. Here, registration-url – is the transport gateway URL. For more information, see CSSM Satellite. registration-url has the following form: https://<OnPrem-FQDN>/SmartTransport Use the “no” form of this command, Example: |
Verifying Utility Reporting
To verify that utility reporting data is being sent from the CSSM satellite to Cisco, enter the command shown in the following example, in configuration mode:
show license all
In the sample output shown below, in the “Utility” section, the line “Last attempt: SUCCEEDED on Dec 19 18:23:02 2017 UTC” shows when the utility report data was last sent successfully. Other data shows the date and time that the report was sent, and the expected date and time of the next utility report (4 hours later).
Smart Licensing Status
==================

Smart Licensing is ENABLED

Registration:
  Status: REGISTERED
  Export-Controlled Functionality: Allowed
  Initial Registration: SUCCEEDED on Dec 13 16:11:51 2017 UTC
  Last Renewal Attempt: None
  Next Renewal Attempt: Feb 19 16:24:44 2018 UTC
  Registration Expires: Jul 05 16:50:33 2018 UTC

License Authorization:
  Status: AUTHORIZED on Dec 13 18:23:51 2017 UTC
  Last Communication Attempt: NOT STARTED
    Failure reason: Device in Thirdparty Utility Mode
  Next Communication Attempt: None
  Communication Deadline: Mar 19 18:23:02 2018 UTC

Utility:
  Status: ENABLED
  Utility report:
    Last success: Dec 19 18:23:03 2017 UTC
    Last attempt: SUCCEEDED on Dec 19 18:23:02 2017 UTC
    Next attempt: Dec 19 22:23:02 2017 UTC

  Customer Information:
    Id: <empty>
    Name: <empty>
    Street: <empty>
    City: <empty>
    State: <empty>
    Country: <empty>
    Postal Code: <empty>

Data Privacy:
  Sending Hostname: yes
    Callhome hostname privacy: DISABLED
    Smart Licensing hostname privacy: DISABLED
  Version privacy: DISABLED

Transport:
  Type: Smart
  Registration URL: https://cssm-onprem.dcloud.cisco.com/SmartTransport
  Utility URL: http://10.87.9.106/Transportgateway/services/DeviceRequestHandler

License Usage
==============

(ax_1G):
  Description:
  Count: 1
  Version: 1.0
  Status: AUTHORIZED
  Utility Subscription id:  81

Product Information
===================
UDI: PID:CSR1000V,SN:9ZT6BKI8CXG

Agent Version
=============
Smart Agent for Licensing: 4.3.0_rel/8
Component Versions: SA:(1_3_dev)1.0.15, SI:(dev22)1.2.1, CH:(rel5)1.0.3, PK:(dev18)1.0.3
To set the information that will appear in the “Customer Information” section of the show license command above, use the following command:
license smart utility customer_info info_type info_value , where info_type is one of the following: city, country, id, name, postalcode, state, street.
Example
license smart utility customer_info city New YorkTroubleshooting Cisco Smart License Issues
Determining Device Registration Information
Use the show license all command to display the device registration information.
Router#show license all
Smart Licensing Status
======================
Smart Licensing is ENABLED
Registration:
  Status: REGISTERED
  Smart Account: BU Production Test
  Virtual Account: CRDC_SH_3
  Export-Controlled Functionality: Allowed
  Initial Registration: SUCCEEDED on Jul 08 20:45:54 2015 UTC
  Last Renewal Attempt: None
  Next Renewal Attempt: Jan 04 20:45:54 2016 UTC
  Registration Expires: Jul 07 05:59:29 2016 UTC
License Authorization:
  Status: AUTHORIZED on Jul 08 20:46:05 2015 UTC
  Last Communication Attempt: SUCCEEDED on Jul 08 20:46:05 2015 UTC
  Next Communication Attempt: Aug 07 20:46:05 2015 UTC
  Communication Deadline: Oct 06 05:59:43 2015 UTC
License Usage
==============
CSR 1KV AX 500M (ax_500M):
  Description: CSR 1KV AX 500M
  Count: 1
  Version: 1.0
  Status: AUTHORIZED
Product Information
===================
UDI: PID:CSR1000v,SN:9Q0BWG3BHL0
Agent Version
=============
Smart Agent for Licensing: 1.4.0_rel/11
Component Versions: SA:(1_4_rel)1.0.10, SI:(rel21)1.2.0, CH:(rel4)1.0.23, PK:(rel17)1.0.5
Additional Commands for Troubleshooting
The show call-home profile all and show license tech support commands may be helpful during troubleshooting.
Understanding the License-Based Restriction on Aggregate Bandwidth
The router includes a license shaper that may restrict the aggregate bandwidth of the router’s interfaces. For example, if a 50 Mbps license is installed, then a maximum of 50 Mbps of bidirectional traffic is possible.
The license shaper regulates the throughput on interfaces for both priority traffic and non-priority traffic:
-
(Cisco IOS XE 3.10S and earlier) The license shaper regulates the throughput on non-management interfaces only. The GigabitEthernet 0 dedicated management interface is not counted
.
-
(Cisco IOS XE 3.11S and later, and IOS XE Denali 16.2 and later) The license shaper regulates the throughput on all interfaces.
Throughput limits are checked globally, not on a per-interface basis. The license shaper does not distinguish between different types of traffic, such as for IPSec or NAT. If the throughput level is exceeded, then packets may get discarded.
The figure below shows how the license shaper, also known as a traffic shaper, works. In this example, the four interfaces on a Cisco CSR 1000v are passing an aggregated traffic level of 60 Mbps. Because this exceeds the 50 Mbps license-enforced maximum throughput, 10 Mbps of traffic is discarded.
To check the license-based performance limiter value, use the following command for your interface:
Router# show platform hardware qfp active feature qos queue out int GigabitEthernet1 hier det | inc max:
     orig_max  : 0   ,  max: 33333          child policy-map
     orig_max  : 0   ,  max: 500000         parent policy-map
     orig_max  : 0   ,  max: 1050000000     interface rate limiter
     orig_max  : 0   ,  max: 2500000        license performance limiter
     orig_max  : 0   ,  max: 10000000000    entry for ROOT/SIP infra (ignore rate)
The value for the license performance limiter field should match the current maximum throughput level as shown with the show platform hardware throughput level command.
| Note |
The license shaper includes an extra scheduler node in the default HQF hierarchy. The router does not provide an option to detect congestion for a particular node in the HQF hierarchy. |
For more information about verifying the VM performance indicators, see your hypervisor documentation.
To verify the actual throughput, use the following command:
Router# show platform hardware qfp active datapath utilization summary
      CPP 0:                 5 secs    1 min     5 min     60 min
      Input:   Total (pps)    59232     59234     59237     59234
                     (bps)    58757104  58757824  58760840  58757880
      Output:  Total (pps)    48839     48835     48833     48833
                     (bps)    50011264  50012072  50009312  498768736
      Processing: Load (pct)  33        34        34        34
In the example, the input rate shown in bold is close to 60 Mbps. The output rate shown in bold is close to 50 Mbps. In this case, the input rate exceeds 50 Mbps, the maximum license rate allowed.
The following command displays the number of packages dropped when the maximum throughput is exceeded:
Router# show platform hardware qfp active statistics drop clear | exc _0_
-------------------------------------------------------------------------
Global Drop Stats                 Packets           Octets
-------------------------------------------------------------------------
TailDrop                          2018258           256333010
When the actual throughput level approaches the maximum allowed by the installed license, you will receive an alert message similar to the following (the message may differ depending on the release version):
Dec 13 22:00:29.699: %BW_LICENSE-3-THROUGHPUT_THRESHOLD_LEVEL: F0: cpp_ha:
Average throughput rate exceeded 95 percent of licensed bandwidth 3 times, sample period 300 seconds, in last 24 hours
When the throughput exceeds the maximum allowed bandwidth set by the license, you will receive an alert message similar to the following (Cisco IOS XE 3.12S and later):
*Dec 13 22:00:29.699: %BW_LICENSE-4-THROUGHPUT_MAX_LEVEL: F0: cpp_ha:
Average throughput rate exceeded the total licensed bandwidth 50000000 bps and dropped 7 times, sample period 300 seconds, in last 24 hours
You can configure the QoS policies at the interface level to guarantee that high-priority traffic is not dropped. For more information, see the QoS configuration guides: https://www.cisco.com/c/en/us/support/routers/cloud-services-router-1000v-series/products-installation-and-configuration-guides-list.html.
Managing Throughput Notifications
You can configure the Cisco CSR 1000v/ ISRv to notify you when a certain percentage of the maximum throughput level is reached. The maximum allowable throughput is based on the installed throughput license.
| Note |
This feature is available on Cisco IOS XE 3.13S or later, and Cisco IOS XE Denali 16.3.1 and later. |
By default, when the router first boots, the throughput level notification is enabled, and notifications are sent when the router reaches 95 percent of the maximum throughput level. The throughput level is measured every 300 seconds. When the router is rebooted, the threshold and interval level settings configured using the set platform hardware throughput-monitor command are retained.
The following command configures the hardware throughput monitor settings. The threshold percentage value represents the percentage of the maximum throughput at which the system notifies you. The valid range is from 75 to 95, and the default value is 95 percent.
The interval value represents how often the system measures the throughput level. The valid range is from 30 to 86400 seconds. The default value is 300 seconds.
set platform hardware throughput-monitor threshold percentage interval seconds
Example
Router# set platform hardware throughput-monitor threshold 85 interval 30
To display the platform hardware throughput monitor settings, use the show platform hardware throughput-monitor parameters command, as shown in the following example:
Router# show platform hardware throughput-monitor parameters

  Throughput monitor parameters
  Throughput monitor threshold: 95 percent
  Throughput monitor interval: 300 seconds
  Throughput monitor status: enabled
The following example shows a console log message received when the average throughput has exceeded 95 percent of the maximum throughput with a sample period of 300 seconds:
Dec 13 22:00:29.699: %BW_LICENSE-3-THROUGHPUT_THRESHOLD_LEVEL: F0: cpp_ha: Average
throughput rate exceeded 95 percent of licensed bandwidth 3 times, sample
 period 300 seconds, in last 24 hours
The following example shows a console log message received when the average throughput approaches maximum allowed throughput set by the installed license:
Dec 13 22:00:29.699: %BW_LICENSE-4-THROUGHPUT_MAX_LEVEL: F0: cpp_ha: Average
throughput rate exceeded the total licensed bandwidth 50000000 bps and dropped
packets 7 times, sample period 300 seconds, in last 24 Hours
To disable the platform hardware throughput monitor, perform the following command:
set platform hardware throughput-monitor disable
Requesting a New Virtual UDI
The router’s license is node-locked to the vUDI. If you clone the router’s VM to a new VM instance, the vUDI is in most cases automatically updated when the router first boots up on the cloned machine. However, if the vUDI is not automatically updated, you must manually request a new vUDI on the cloned VM instance.
 Caution Caution |
Requesting a new vUDI will invalidate the existing license. If you later need to rehost the license due to a system failure, you may need to perform additional steps on the Cisco Software Licensing portal. For more information on rehosting the router license, see Voluntarily Rehosting the License to a New VM and Obtaining a Rehost License if the System Fails. |
Perform the following step in EXEC mode:
SUMMARY STEPS
- request license new-udi
DETAILED STEPS
| Command or Action | Purpose |
|---|---|
|
request license new-udi Example: |
Requests that a new virtual UDI be assigned to the router’s VM instance. |
What to do next
Once you enter the request license new-udi command, you will be prompted to confirm, and then you will receive a series of system messages confirming the request:
Executing this command will invalidate the existing license,
proceed with generating new-udi?[confirm]
New udi CSR1000v:9MF19951DMU
Router#
*Aug 21 11:24:27.275:  found an eval license info: csr1kv_medium
*Aug 21 11:24:27.276:  Step 3. deletion of NOT-in-use licenses
*Aug 21 11:24:27.276:  Step 4. deletion of in-use licenses
*Aug 21 11:24:27.440: %LICENSE-2-UDI_CHANGED: UDI of this instance changed from OLD: CSR1000V:9YA3086B993 to
New: CSR1000V:9MF19951DMU
To display the UDI history of the router’s feature license, including previous virtual UDIs, enter the show license udi history command. The following example displays the UDI history of the feature license of a Cisco CSR 1000v:
Router# show license udi history
SlotID   PID                    SN                      UDI
--------------------------------------------------------------------------------
*        CSR1000V              9MF19951DMU     CSR1000V:9MF19951DMU
 Invalidated UDIs:
------------------------------------------------------------
1. CSR1000V : 9YA3086B993
Cisco Software Licensing (IOS XE 3.12 or Earlier)
Activating CSL Evaluation Licenses for Cisco IOS XE 3.12S and Earlier
| Note |
Licenses provided in Cisco IOS XE 3.12S and earlier (Standard, Advanced, and Premium) are no longer available. This material is provided as legacy information. |
When the Cisco CSR 1000v first boots, the network interfaces are activated but feature support is limited and the throughput is limited to 2.5 Mbps. The evaluation license is bundled with the software, but you must activate the evaluation license to access the features.
The evaluation license expires 60 days from the time it is activated.
SUMMARY STEPS
- enable
- configure terminal
- license boot level { standard | advanced | premium }
- end
- write memory
- reload
- show license detail
- show platform hardware throughput level
DETAILED STEPS
| Command or Action | Purpose | |||
|---|---|---|---|---|
| Step 1 |
enable Example: |
Enables privileged EXEC mode.
|
||
| Step 2 |
configure terminal Example: |
Enters global configuration mode. |
||
| Step 3 |
license boot level { standard | advanced | premium } Example:Example:Example:Example: |
Activates the evaluation license on the Cisco CSR 1000v upon the next reload. You must accept the End User License Agreement (EULA) to use the evaluation license.
|
||
| Step 4 |
end Example: |
Exits global configuration mode. |
||
| Step 5 |
write memory Example: |
Saves the running configuration to NVRAM. |
||
| Step 6 |
reload Example: |
Restarts the Cisco CSR 1000v to boot to the feature level set using the license boot level command. |
||
| Step 7 |
show license detail Example: |
After the Cisco CSR 1000v restarts, verifies that the license has been installed and is active. |
||
| Step 8 |
show platform hardware throughput level Example:Example: |
Verifies the Cisco CSR 1000v maximum throughput level. |
What to do next
The evaluation license expires 60 days from the time it is activated.
Installing CSL Regular Licenses for Cisco IOS XE 3.12S and Earlier
| Note |
Licenses provided in Cisco IOS XE 3.12S and earlier (Standard, Advanced, and Premium) are no longer available. This material is provided as legacy information. |
In Cisco IOS XE 3.12S and earlier, the Cisco CSR 1000v first boots in limited mode with the Standard feature set enabled and the maximum throughput limited to 2.5 Mbps.
You can generate multiple licenses for the Cisco CSR 1000v from one PAK. The purchased PAK determines the number of licenses you can generate.
Repeat these steps for each license available for your PAK.
SUMMARY STEPS
- Obtain the PAK.
- enable
- show license udi
- Convert the PAK to a license by entering the PAK and the UDI into the Cisco Product License registration portal: “http:/www.cisco.com/go/license”
- license install stored-location-url
- configure terminal
- license boot level { standard | advanced | premium }
- end
- write memory
- reload
- show license detail
- end
- configure terminal
- platform hardware throughput level MB {10 | 100 | 1000 | 250 | 2500 | 50 | 500 | 5000 }
- end
- show platform hardware throughput level
DETAILED STEPS
| Command or Action | Purpose | |||
|---|---|---|---|---|
| Step 1 |
Obtain the PAK. |
The PAK is provided to you when you order or purchase the right to use a feature set.
|
||
| Step 2 |
enable Example: |
Enables privileged EXEC mode.
|
||
| Step 3 |
show license udi Example: |
Displays all the UDI values that can be licensed in a system.
|
||
| Step 4 |
Convert the PAK to a license by entering the PAK and the UDI into the Cisco Product License registration portal: “http:/www.cisco.com/go/license” Example: |
After entering the appropriate information, you will receive an e-mail containing the license information that you can use to install the license:
|
||
| Step 5 |
license install stored-location-url Example: |
Installs the license.
|
||
| Step 6 |
configure terminal Example: |
Enters global configuration mode. |
||
| Step 7 |
license boot level { standard | advanced | premium } Example: |
Activates the license on the Cisco CSR 1000v upon the next reload.
|
||
| Step 8 |
end Example: |
Exits global configuration mode. |
||
| Step 9 |
write memory Example: |
Saves the running configuration to NVRAM. |
||
| Step 10 |
reload Example: |
Restarts the Cisco CSR 1000v to enable the feature set and the maximum throughput supported by the license. |
||
| Step 11 |
show license detail Example: |
After the Cisco CSR 1000v restarts, verifies that the license has been installed and is active. |
||
| Step 12 |
end Example: |
Exits global configuration mode. |
||
| Step 13 |
configure terminal Example: |
Enters global configuration mode. |
||
| Step 14 |
platform hardware throughput level MB {10 | 100 | 1000 | 250 | 2500 | 50 | 500 | 5000 } Example: |
(Optional) Changes the maximum throughput level for the Cisco CSR 1000v. The available throughput options vary depending on the release version.
|
||
| Step 15 |
end Example: |
Exits global configuration mode. |
||
| Step 16 |
show platform hardware throughput level Example:Example: |
Verifies that the Cisco CSR 1000v maximum throughput level matches that of the installed license. |
What to do next
Repeat these steps for each license available for your PAK.
The following is an example of the show license detail command showing an installed active license:
Router# show license detail
Index: 1        Feature: prem_100M                          Version: 1.0
        License Type: Permanent
        License State: Active, In Use
        License Count: Non-Counted
        License Priority: Medium
        Store Index: 0
        Store Name: Primary License Storage
مرحله 4:
بر روی OK کلیک کنید.
- فایروال سیسکو: Cisco ASA-X
- فایروال فایرپاور سیسکو: Cisco FPR 1000 , 2100 , 4100 , 9300
- لایسنس NGFW , TAMC , WSA ASA ASAv , ESA
- لایسنس سیسکو
- لایسنس اسپلانک SPLUNK